
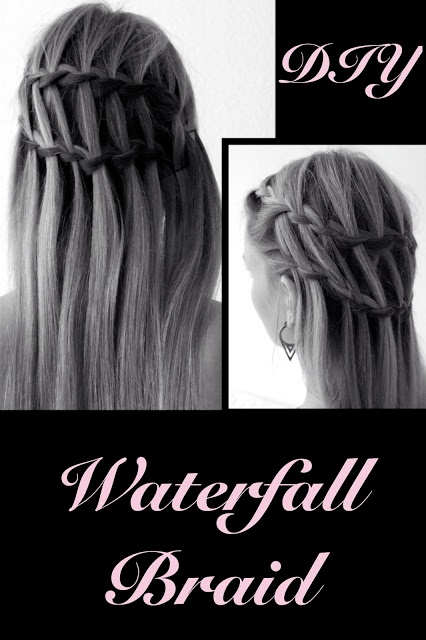
Heute haben wir ein Haar Do it yourself hochgeladen, für die Mädels, die noch schnell eine schöne Frisur zum Feiern brauchen oder einfach mal Lust haben etwas neues auszuprobieren!
Der „Waterfall Braid“ eignet sich am Besten für glattes Haar, man
kann es aber auch genauso gut in gewellten Haaren anwenden.
Nicht direkt beim ersten Mal verzweifeln, mit ein bisschen Übung kommt ihr sicherlich zu einem schönen Ergebnis.
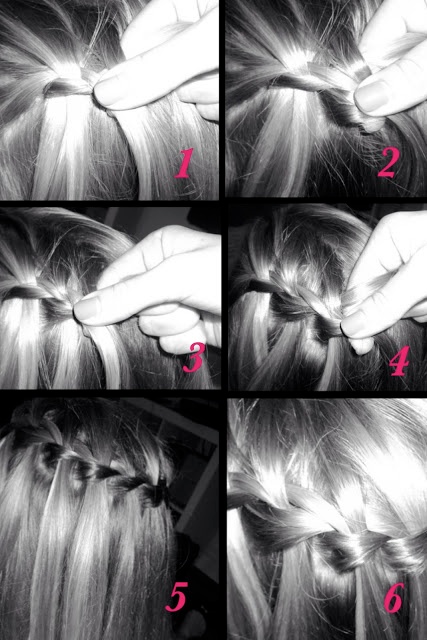
Bevor ihr mit dem Flechten beginnt, muss man die Haare richtig gut durchkämmen und dann geht’s auch schon los!
1. Ihr nehmt euch an der Seite vom Kopf eine kleine Partie Haare und teilt diese in drei gleich große Stränen auf. Fangt einfach an wie beim Bauernzopf zu flechten. Wenn ihr die Strähnen drei mal übereinander gelegt habt nehmt ihr euch, wie auch beim Bauernzopf, eine neue Strähne von oben zum Zopf dazu.
2. Nun kommt der schwierige Teil, habt ihr den einmal verstanden, läuft der Zopf wie von alleine weiter! Die Strähne, die nun eigentlich von unten nach oben in den Zopf geführt wird, wird einfach fallen gelassen und ihr nehmt euch eine ganz neue Strähne vom Kopf dazu und flechtet sie in den Zopf hinein.
3. Nun wird wie bei Schritt 1. eine neue Strähne, von oben, zu einer schon vorhandenen Strähne dazugelegt und in den Zopf verflochten.
4. Jetzt lasst ihr die untere Strähne wieder fallen und nehmt eine ganz neue Strähne, die ihr in den Zopf flechtet, das wiederholt ihr jetzt bis ihr zum Schluss angekommen seid. Entweder steckt ihr den Zopf mit ein paar Haarspangen fest oder ihr flechtet den Zopf ganz normal weiter bis zum schluss und fixiert ihn mit einem Haargummi.
5./6. Und so sieht dann am Ende das Ergebnis aus :)!
Für einen speziellen Look könnt ihr den Zopf auch ein weiteres mal unter den Ersten flechten und bekommt dann zwei Wasserfall-Zöpfe untereinender.
Viel Spaß beim ausprobieren!
Today we uploadeded a hair tutorial for those girls who need a new hairdo to go out, or just for those who want to try something new!
The „Waterfall Braid“ works best on straigt hair or lose waves. Don’t become all desperate at your first try, with a little practise you’ll get a beautiful result.
Before you start to braid you need to comb your hair. Here we go let’s get this started!
1. You take a section of your hair and you start French braiding it. Braid your strands three times, once you’re done with that you add more hair to it like a French braid.
2. Now this is the tricky part, but if you’ve once understood how it works it’ll be super easy.
Now you drop the strand, which is supposed to go from the upper part to the bottom and let it fall. Then you pick up a new section of hair right next to your old strand, which just fell. With that new strand you keep on French braiding.
3. Like in our first step, you take a new section of hair to your old strands and braid it together.
4. Now you just need to repeat this untill you’re finished. You French braid your left strand, drop the right strand and pick up a new section of hair. When you’re done,you can either way secure it with some bobby pins, or you keep on braiding and tie it with a hair tie.
5./6. And this is how your result looks like!
For a special look you can braid another Waterfall Braid underneath your first one!
Have fun trying!
