
Heute zeigen wir euch ein Tutorial zu den beliebten und wunderschönen Ombre Nails.
Durch den sanften Übergang zweier oder auch mehrerer verschiedener Farben wird jeder einfacher Nagel zu einem individuellen Schmuckstück!
Keine Angst Mädels, es geht schnell und ist super einfach!
Was ihr braucht:
– mindestens zwei verschiedenfarbige Nagellacke
– einen durchsichtigen Überlack
– ein Schminkschwämmchen
– einen Zahnstocher
– und eine alte Zeitschrift oder Folie als Unterlage
Und dann geht’s auch schon los!
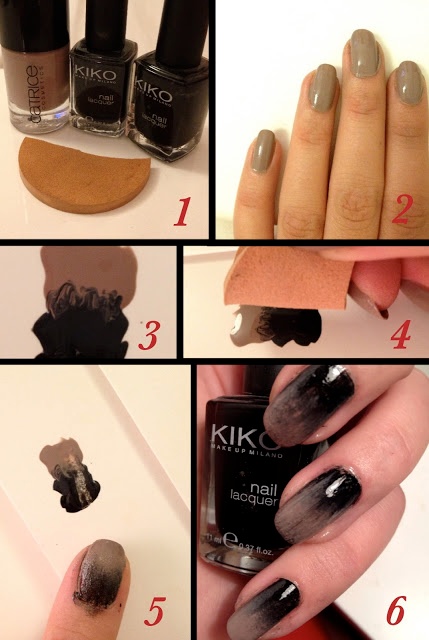
1-2. Ihr lackiert eure Nägel wie gewohnt in der Farbe, die ihr als Basisfarbe ausgewählt habt und lasst sie gut trocknen.
3. Wenn die Nägel richtig trocken sind, tragt ihr eure Basisfarbe und eure neue Kontrastfarbe direkt nebeneinander auf die Unterlage auf und verwischt mit dem Zahnstocher den Übergang.
4. Jetzt kommt das Schminkschwämmchen zum Einsatz! Ihr tupft den Schwamm nun in die Farbe auf eurer Unterlage.
5. Und nun übertragt ihr den Lack durch leichtes Tupfen auf eure Nägel.
6. Bevor ihr den Klarlack als Finish auftragt, entfernt noch die Überreste des Nagellackes auf der Nagelhaut mit ein bisschen Nagellackentferner. Der durchsichtige Überlack macht den Look perfekt!
So einfach geht’s! Viel Spaß beim Ausprobieren!
Today we show you an all new tutorial to the popular and beautiful ombre nails.
Every plain nail will become its own piece of jewelry, just through the smooth blending of two or even more different colors.
Don’t worry girls it’s very fast and super easy!
What you need is:
– at least two different colors of nailpolish
– a topcoat
– a cosmetic sponge
– a toothpick
– and an old magazine or a plastic sheet as a base
Let’s begin!
1-2. Paint your nails with the lightest of the two colors. Wait for it to dry completely.
3. Once your nails are dry, you can start painting a little amount of the colors right next to each other on to your base. Now you blur the blending of the two colors by using the toothpick.
4. Now this is where the cosmetic sponge is deployed. Take your sponge and dap it on to your nail polish on the plastic sheet.
5. Dap your sponge on to your nail a few times, untill the nail is completely covered with both colors.
6. Before you add your topcoat, make sure you remove the remains of nail polish on your cuticle with a little nail polish remover.
Once you’ve added the topcoat, your result will be perfect!
It’s that simple! Have fun trying!
